
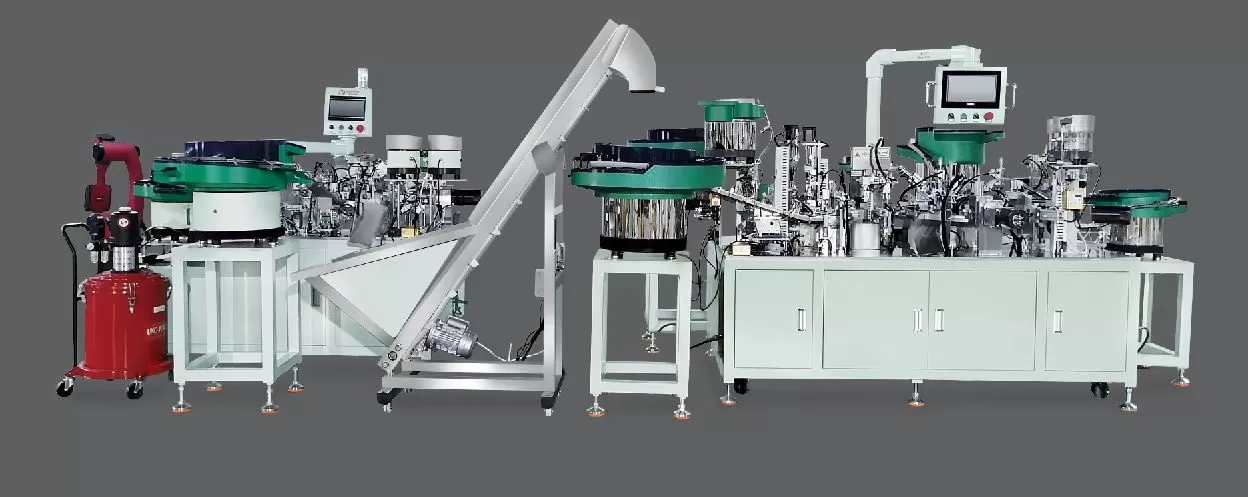
Operating an automatic hinge assembly machine demands strict adherence to standard procedures to ensure product consistency, operational safety, and optimal production output. This SOP provides detailed guidelines for operating Jieyang-manufactured hinge automatic assembly machines, designed to enhance operator efficiency and reduce errors in the assembly process.
1. Pre-Operation Inspection and Preparation
Before starting the machine, operators must conduct a thorough pre-operation check. First, verify the power supply connections to ensure they match the machine’s specified voltage (typically 220V/380V AC, 50/60Hz). Check the air pressure gauge to confirm the compressed air pressure is within the recommended range (usually 0.6-0.8 MPa). Inspect all lubrication points—such as gearboxes, guide rails, and bearing seats—to ensure adequate lubrication; insufficient lubrication can cause premature wear and affect machine precision. Additionally, confirm that all safety devices, including emergency stop buttons, safety interlocks, and photoelectric sensors, are functional. Review the machine’s control panel for any error messages or alerts, and power on the system to initialize the control software, allowing it to self-test and display normal operation status.
2. Machine Startup and Initialization
Once pre-operation checks are complete, proceed with the startup sequence. Turn on the main power switch and wait for the control system to boot up completely (this may take 30-60 seconds). After the system initializes, navigate to the parameter settings interface to verify critical production parameters: assembly speed, positioning accuracy, and tool pressure. These parameters should align with the specific hinge model being produced, which can be adjusted using the control panel’s touchscreen or keypad. Ensure that the machine’s homing function is performed first, as this sets the reference position for all subsequent operations. Once the machine is homed and parameters are confirmed, activate the "ready" signal to indicate the system is prepared for operation.
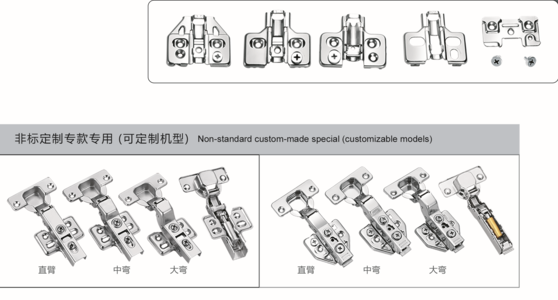
3. Loading Components and Tool Setup
Before commencing the assembly process, properly load the necessary components and set up the machine tools. For hinge assembly, this typically includes metal leaves, pins, springs, and other small parts. Use the machine’s material feeding system to load the components into designated hoppers or trays. Ensure components are correctly oriented to prevent jamming during the assembly cycle—misaligned parts can lead to incorrect assembly and quality defects. Next, calibrate the tooling: check the positioning fixtures, crimping dies, and feeding nozzles to ensure they are securely mounted and aligned. Use a precision measuring tool to verify that tooling dimensions match the required hinge specifications (e.g., pin hole diameter, leaf dimensions). If adjustments are needed, follow the tool setup manual provided by the manufacturer to make precise adjustments, then lock all tooling components to prevent movement during operation.
4. Assembly Process Execution
With components loaded and tools calibrated, initiate the assembly process. The machine’s automatic cycle will start, beginning with the feeding mechanism delivering the first component (e.g., a hinge leaf) to the positioning station. A robotic arm or mechanical gripper then transfers the component to the assembly area, where it is held securely by clamping fixtures. The next component (e.g., a pin) is fed to the insertion station, guided by alignment pins to ensure accurate placement into pre-drilled holes in the hinge leaf. A press unit then applies controlled pressure to insert the pin, ensuring proper seating and a snug fit. For hinges with additional features (e.g., springs), the spring-loading mechanism is activated to position and secure the spring in place, followed by final alignment of all components. Throughout this process, the machine’s vision system may perform real-time checks to confirm component placement and orientation, with any misalignments triggering a reject signal to divert the defective part from the production line.
5. Quality Control and Testing
After each hinge is assembled, a dedicated quality control station performs non-destructive testing to verify product compliance. First, measure the hinge dimensions using a caliper or automated inspection device to check for conformance to design specifications (e.g., leaf thickness, pin length, gap between leaves). Next, test the hinge’s functionality by manually operating it to ensure smooth opening and closing, with no binding or excessive resistance. For critical applications, the machine may include a durability test, such as repeatedly opening and closing the hinge to simulate long-term use. If the hinge passes all tests, it is moved to the packaging station; failed parts are collected in a reject bin for further analysis. Record all quality control results in the machine’s log system to track production consistency over time.
6. Post-Operation Shutdown and Maintenance
At the end of the production shift, follow the shutdown procedure to ensure machine safety and extend its lifespan. First, stop the assembly process and return all components to their storage locations, removing any leftover materials from the worktable to prevent contamination. Press the emergency stop button only in case of immediate danger; for routine shutdowns, use the control panel’s shutdown sequence. Once the machine has powered down, turn off the main power switch and close the compressed air valve to prevent pressure buildup in the system. Perform a quick visual inspection to identify any loose components, damaged hoses, or oil leaks, and tighten or replace any faulty parts as needed. Finally, clean the machine’s surfaces and worktable with a lint-free cloth and appropriate cleaning solution to remove debris, ensuring a clean working environment for the next shift.
7. Troubleshooting Common Issues
Even with proper operation, the automatic assembly machine may encounter common issues during production. One frequent problem is component jamming, which can occur if parts are misoriented or the feeding mechanism is clogged. To resolve this, stop the machine, clear the jammed components from the conveyor or gripper, and adjust the orientation of the feeding hopper or tooling to ensure parts are properly aligned. Another issue is reduced assembly precision, which may stem from worn tooling or loose fixtures. In this case, inspect the positioning fixtures and replace any worn components (e.g., guide rails, clamping pads) with OEM or certified spare parts. For inconsistent pressure during pin insertion, check the air pressure regulator and adjust the pressure if necessary, or service the press unit’s hydraulic or pneumatic lines to remove air bubbles. Refer to the machine’s troubleshooting manual for detailed diagnostic steps, and contact Sanyhore’s technical support team for assistance with complex issues.
8. Documentation and Training
To maintain consistent operation, all operators must receive proper training on the assembly machine’s SOP. Training should cover pre-operation checks, startup procedures, component loading, quality control, and basic troubleshooting. Operators must also be familiar with the machine’s control panel interface, including how to input production parameters, view real-time data, and generate reports. All training records should be documented and updated as needed to reflect changes in the SOP or machine modifications. Additionally, maintain detailed operation logs, including daily startup checks, production counts, and maintenance performed, to track machine performance and identify trends. For manufacturers seeking to optimize their hinge production line, Sanyhore offers comprehensive support, including custom machine configurations, spare parts supply, and on-site training services.
For inquiries about Sanyhore’s hinge automatic assembly machines or to discuss how our equipment can enhance your production efficiency, contact our sales manager at +86 13425506550 or email info@sanyhore.com. Our team of experts is ready to assist with your specific manufacturing needs.